一、命令模式定义
命令大家都不会陌生,那么在开始命令模式之前,可以想象一下生活中的命令模式的特点:
如老板命令你完成一个OA项目是一个命令,接着看看其特点:
1、在上面的命令中,命令的执行者肯定是聪明的你了。具体的执行方法,可能是通过vs实现,或者是通过eclipse实现,由此看来:命令要有个命令的执行者,还要有个命令的执行方法。
2、命令的发出者很明显是老板,老板还有个发出方法,可能是通过电话给你说,也可能给你邮件给你说,也可能是通过开会给你说。所以命令的发出者要有一个命令,还要有个发出的方法。
3、最后看看命令,命令有个名字,命令的肯定要执行。而且命令是在boss给你发出通知后执行的。
接下来看看命令模式的定义:
命令模式:将请求封装成对象,以便使用不同的请求、日志、队列等来参数化其他对象。命令模式也支持撤销操作。
每次讲一个模式时,从定义都不能体会其中的技巧,所以接着我会通过举例子来说明命令模式。
二、命令模式的举例
下面来看看多用遥控器是如何使用命令模式的。
2.1需求
假设某个公司需要设计一个多用功能的遥控器。基本的需求如下:
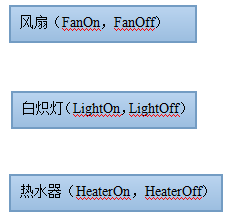
该遥控器有可以控制风扇,白炽灯,热水器等等的多对开关,而且可能还有其他的电器,暂时不做其功能,但是希望可以保留接口,用的时间可以方便的扩展。
除上面的需求之外,还需要有个按钮,可以撤销上一步的操作。基本功能如下图:

2.2问题
在设计遥控器时,风扇,白炽灯,热水器的开关方法已经定义好,其名字各不相同。不妨设置其方法为如下:
由于各种电器的开关方法都不一样,而且还存在一个待扩展的电器,如果没有学习命名模式之前,我们在设置扩展的开关时,会出现的问题是什么呢?假设现在有电视,冰箱还可能会用到遥控器,那么我们会在最后一个开关上写if else,当然如果哪一天有多了一个大门也加入了我们的遥控的行列,这样我们继续加if else ,很显然随着电器的高速发展,会有多个需要遥控可以控制的。
举个例子,如果我们是需要遥控的客户,现在有一款遥控如果有遥控可以进行扩展,一种是可以扩展指定类型的,像上面的,只能再去扩展电视和冰箱中的一种,偶尔有一天你看到隔壁邻居的门,也可以使用遥控了,所以你去把你的高级遥控器,拿到扩展店时,扩展工程师说了,现在只能扩展电视和冰箱,不支持对大门的遥控扩展.
我们肯定是希望,可以自由的扩展,大门可以使用遥控了,就对大门扩展,车门使用遥控了,就对车门扩展……其实也就是一种松耦合的实现。
2.3分析问题
为了实现松耦合,我们现在来想一下,周末去请朋友吃饭,服务员mm问你吃什么,你说水煮活鱼,然后在菜单上面,写上水煮活鱼。下个星期天想吃花生米啤酒,同样也写在订单上,然后服务员mm把订单拿给厨师。
在上面的例子中,无论你点了什么菜,服务员mm,只需要知道顾客点的什么菜,从而给不同的厨师做(虽然不是直接的,但最终凉菜会给凉菜的师傅做,热菜的会给热菜的厨师做),然而具体的怎么做是厨师的事情,服务员知道顾客点上面菜,只是为了能正确的交个厨师去做。
其实在这个例子中,也是一个命令模式的例子,不同的订单对应的有不同的厨师,最终订单拿到厨师面前,就是对厨师下了个命令,要做菜了。每订单或者说是每种菜都对应着自己的厨师,所以,客服需要有订单的的引用,订单为了知道调用哪个厨师,需要有厨师引用;两个引用都是使用的组合。从而可以调用多种自己需要对象的方法来实现松耦合。这里记住:客服mm知道顾客点菜的目的是为了让不同的厨师去做。再直接一些就是为了使用不同的命令。
上面的吃饭问题和我们的遥控器问题差不多,都是包含下命令,命令的执行者,以及命令的具体内容。如果还是有些不清楚的话,就用简单的程序模拟一下上面的过程:


 1 class Program
 2 {
 3      static void Main(string[] args)
 4      {
 5          MM mm = new MM();
 6          //想吃热菜
 7          mm.SetOrder(new ReCaiOrder());
 8          //mm还需要把菜单拿到厨师那里哦
 9          mm.OnOrder();
10          //想吃凉菜
11          mm.SetOrder(new LiangCaiOrder());
12          mm.OnOrder();
13          Console.ReadKey();
14      }
15 }
16
17 /// <summary>
18 /// 订单
19 /// </summary>
20 interface IOrder
21 {
22      void Excute();
23 }
24
25 /// <summary>
26 /// 凉菜做法
27 /// </summary>
28 class LiangCaiChuShi
29 {
30      public void MakeCook()
31      {
32          Console.WriteLine("凉菜~!!!");
33      }
34 }
35 /// <summary>
36 /// 凉菜订单
37 /// </summary>
38 class LiangCaiOrder:IOrder
39 {
40      LiangCaiChuShi chushi=new LiangCaiChuShi();
41      public void Excute()
42      {
43          chushi.MakeCook();
44      }
45 }
46 /// <summary>
47 /// 热菜做法
48 /// </summary>
49 class ReCaiChuShi
50 {
51      public void Cook()
52      {
53          Console.WriteLine("热菜!!");
54      }
55 }
56
57 /// <summary>
58 /// 热菜订单
59 /// </summary>
60 class ReCaiOrder : IOrder
61 {
62      ReCaiChuShi chushi=new ReCaiChuShi();
63      public void Excute()
64      {
65          chushi.Cook();
66      }
67 }
68 class MM
69 {
70      IOrder order;
71      public void SetOrder(IOrder order)
72      {
73          this.order = order;
74      }
75      public void OnOrder()
76      {
77          order.Excute();
78      }
79 }
View Code
上面的例子中,厨师的做法有可能不同,就像我们遥控器的开关一样,电器的开关方法不一定相同。如果要执行,只需要把这个方法包在命令的激发方法中,然后去调用具体的方法就可以了。
尽管上面的例子有些牵强,但是还是模拟了命令的过程,为我们遥控器的设计提供了思路。
2.4解决问题
回到我们的遥控器问题上面来,我们可以先定义好我们的风扇,白炽灯,热水器。然后定义其分别的开关命令,每个命令都有自己对应的电器引用,而且会在命令的Excute中包装电器的开或者关,最后需要把命令安装到遥控器上面,在遥控器上每个按钮都对应有自己的激发方法,其代码如下:
  1 using System;
  2 using System.Collections.Generic;
  3 using System.Linq;
  4 using System.Text;
  5 using System.Threading.Tasks;
  6
  7 namespace RemoteControl
  8 {
  9     class Program
 10     {
 11         static void Main(string[] args)
 12         {
 13             //家中的电器
 14             Fan fan=new Fan();
 15             Light light=new Light();
 16             Heater heater=new Heater();
 17
 18             //电器分别对应的命令
 19             FanOffCommand fanOffCommand=new FanOffCommand(fan);
 20             FanOnCommand fanOnCommand=new FanOnCommand(fan);
 21             LightOnCommand lightOnCommand=new LightOnCommand(light);
 22             LightOffCommand lightOffCommand=new LightOffCommand(light);
 23             HeaterOnCommand heaterOnCommand=new HeaterOnCommand(heater);
 24             HeaterOffCommand heaterOffCommand=new HeaterOffCommand(heater);
 25             RemoteControl remoteControl = new RemoteControl();
 26
 27             //设置遥控器
 28             remoteControl.SetCommand(0, fanOnCommand, fanOffCommand);
 29             remoteControl.SetCommand(1, lightOnCommand, lightOffCommand);
 30             remoteControl.SetCommand(2, heaterOnCommand, heaterOffCommand);
 31             //分别测试遥控器的命令
 32             remoteControl.OnButtonWasPress(1);
 33             remoteControl.OffButtonWasPress(1);
 34             remoteControl.OnButtonWasPress(0);
 35             remoteControl.OffButtonWasPress(0);
 36             Console.ReadKey();
 37         }
 38     }
 39
 40     /// <summary>
 41     /// 风扇类
 42     /// </summary>
 43    public class Fan
 44     {
 45         public void FanOn()
 46         {
 47             Console.WriteLine("风扇开了");
 48         }
 49         public void FanOff()
 50         {
 51             Console.WriteLine("风扇关了");
 52         }
 53     }
 54     /// <summary>
 55     /// 灯类
 56     /// </summary>
 57    public class Light
 58    {
 59        public void LightOn()
 60        {
 61            Console.WriteLine("灯亮了");
 62        }
 63        public void LightOff()
 64        {
 65            Console.WriteLine("灯灭了");
 66        }
 67    }
 68     /// <summary>
 69     /// 热水器类
 70     /// </summary>
 71    public class Heater
 72    {
 73        public void HeaterOn()
 74        {
 75            Console.WriteLine("加热中");
 76        }
 77        public void HeaterOff()
 78        {
 79            Console.WriteLine("停止加热");
 80        }
 81    }
 82
 83     /// <summary>
 84     /// 命令接口
 85     /// </summary>
 86    public interface ICommand
 87    {
 88        void Excute();
 89    }
 90
 91    public class FanOnCommand : ICommand
 92    {
 93        Fan fan;
 94        public FanOnCommand(Fan fan)
 95        {
 96            this.fan = fan;
 97        }
 98         public void Excute()
 99         {
100             this.fan.FanOn();
101         }
102     }
103
104    public class FanOffCommand : ICommand
105    {
106        Fan fan;
107        public FanOffCommand(Fan fan)
108        {
109            this.fan = fan;
110        }
111         public void Excute()
112         {
113             this.fan.FanOff();
114         }
115    }
116
117    public class LightOnCommand : ICommand
118    {
119        Light light;
120        public LightOnCommand(Light light)
121        {
122            this.light = light;
123        }
124        public void Excute()
125        {
126            light.LightOn();
127        }
128
129    }
130
131    public class LightOffCommand : ICommand
132    {
133        Light light;
134        public LightOffCommand(Light light)
135        {
136            this.light = light;
137        }
138        public void Excute()
139        {
140            this.light.LightOff();
141        }
142    }
143
144    public class HeaterOnCommand : ICommand
145    {
146        Heater heater;
147        public HeaterOnCommand(Heater heater)
148        {
149            this.heater = heater;
150        }
151        public void Excute()
152        {
153            this.heater.HeaterOn();
154        }
155    }
156
157    public class HeaterOffCommand : ICommand
158    {
159        Heater heater;
160        public HeaterOffCommand(Heater heater)
161        {
162            this.heater = heater;
163        }
164        public void Excute()
165        {
166            this.heater.HeaterOff();
167        }
168    }
169
170    public class NoCommand : ICommand
171    {
172        public void Excute()
173        { }
174    }
175
176    public class RemoteControl
177    {
178       private ICommand[] onCommands;
179       private ICommand[] offCommands;
180       public RemoteControl()
181       {
182          ICommand noCommand=new NoCommand();
183           onCommands = new ICommand[4];
184           offCommands = new ICommand[4];
185           for (int i = 0; i < 4; i++)
186           {
187               onCommands[i] = noCommand;
188               offCommands[i] = noCommand;
189           }
190       }
191
192       public void SetCommand(int slot, ICommand onCommand, ICommand offCommand)
193       {
194           onCommands[slot] = onCommand;
195           offCommands[slot] = offCommand;
196       }
197       public void OnButtonWasPress(int slot)
198       {
199           onCommands[slot].Excute();
200       }
201       public void OffButtonWasPress(int slot)
202       {
203           offCommands[slot].Excute();
204       }
205
206    }
207 }
208
View Code
这样基本上就实现了我们的现有的三种电器的遥控。需要注意的是,在开始初始化遥控器时,对每个命令初始化成了NoCommand,也就是什么都不执行。在命令的初始化经常使用,同时这也解决了我们的在扩展前什么都不做的难题。看了风扇,白炽灯,热水器的遥控实现,进一步的扩展任何的电器,相信都不是什么难事。但是还有个功能没有实现,就是撤销到上一步的操作,接下来我们就来实现撤销操作。
2.5问题的补充说明
撤销操作就想我们遥控中的返回一样。基本上就是灯亮着,突然按了一下关灯,然后再按一下返回键,灯就亮了。其他的电器同样的道理。下面先看一下灯的撤销原理,命令除了执行外还有一个撤销,所以我们需要先都命令的接口添加一个方法。
/// <summary>
/// 命令接口
/// </summary>
public interface ICommand
{
void Excute();
void Undo();
}
对于开灯需要做的修改如下:
public class LightOnCommand : ICommand
{
Light light;
public LightOnCommand(Light light)
{
this.light = light;
}
public void Excute()
{
light.LightOn();
}
/// <summary>
/// 调用命令的反命令
/// </summary>
public void Undo()
{
light.LightOff();
}
}
其他命令同理,代码会在源码中一并给出。也就是每个命令都有自己的反命令,在Undo方法里面也就是调用反命令的Excute方法。每当按下一个按钮时,就去记录其命令的名称,如果按撤销的话,就执行命名的Undo方法。下面给出主要代码:
public void OnButtonWasPressed(int slot)
{
onCommands[slot].Excute();
backCommand=onCommands[slot];
}
public void OffButtonWasPressed(int slot)
{
offCommands[slot].Excute();
backCommand = offCommands[slot];
}
public void BackButtonWasPressed()
{
backCommand.Undo();
}
以上是对遥控器对命令的撤销,需要注意两点1、通过记住命令执行之前的状态,然后去恢复到原来的状态。2、在每次执行之后要记住执行的那个命令。也即记住命令和记住状态。
除了一次执行一个命令和撤销一个命令,当然还可以一次执行多个命令。下面给出主要代码:
public class MutlipleCommand : ICommand
{
ICommand[] commands;
ICommand[] backCommands;
public MutlipleCommand(ICommand[] commands)
{
this.commands = commands;
backCommands = new ICommand[commands.Length];
}
public void Excute()
{
for (int i = 0; i < commands.Length; i++)
{
commands[i].Excute();
backCommands[i] = commands[i];
}
}
public void Undo()
{
for (int i = 0; i < commands.Length; i++)
{
backCommands[i].Undo();
}
}
}
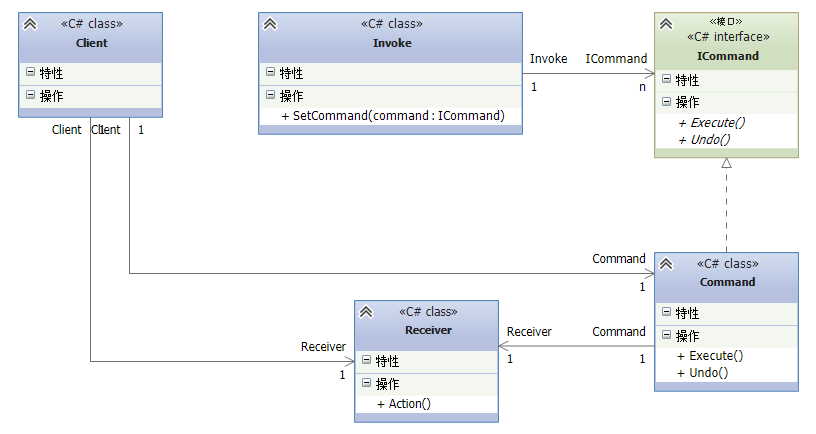
三、命令模式类图
四、总结
命令模式主要通过中介Command实现了发出命令者和命令的执行者,也即Invoke类和Receiver的松耦合。本文先给出了命令模式的定义,通过吃饭的例子给出了使用命令模式实现遥控器设计思路,最后还提到了撤销命令和一个命令实现多个命令的做法。