Command Line Interface
Installing Flask installs the flask script, a Click command line
interface, in your virtualenv. Executed from the terminal, this script gives
access to built-in, extension, and application-defined commands. The --help
option will give more information about any commands and options.
Application Discovery
The flask command is installed by Flask, not your application; it must be
told where to find your application in order to use it. The FLASK_APP
environment variable is used to specify how to load the application.
Unix Bash (Linux, Mac, etc.):
$ export FLASK_APP=hello
$ flask run
Windows CMD:
> set FLASK_APP=hello
> flask run
Windows PowerShell:
> $env:FLASK_APP = "hello"
> flask run
While FLASK_APP supports a variety of options for specifying your
application, most use cases should be simple. Here are the typical values:
- (nothing)
The file
wsgi.pyis imported, automatically detecting an app (app). This provides an easy way to create an app from a factory with extra arguments.FLASK_APP=helloThe name is imported, automatically detecting an app (
app) or factory (create_app).
FLASK_APP has three parts: an optional path that sets the current working
directory, a Python file or dotted import path, and an optional variable
name of the instance or factory. If the name is a factory, it can optionally
be followed by arguments in parentheses. The following values demonstrate these
parts:
FLASK_APP=src/helloSets the current working directory to
srcthen importshello.FLASK_APP=hello.webImports the path
hello.web.FLASK_APP=hello:app2Uses the
app2Flask instance inhello.FLASK_APP="hello:create_app('dev')"The
create_appfactory inhellois called with the string'dev'as the argument.
If FLASK_APP is not set, the command will look for a file called
wsgi.py or app.py and try to detect an application instance or
factory.
Within the given import, the command looks for an application instance named
app or application, then any application instance. If no instance is
found, the command looks for a factory function named create_app or
make_app that returns an instance.
When calling an application factory, if the factory takes an argument named
info, then the ScriptInfo instance is passed as a keyword
argument. If parentheses follow the factory name, their contents are parsed
as Python literals and passes as arguments to the function. This means that
strings must still be in quotes.
Run the Development Server
The run command will start the development server. It
replaces the Flask.run() method in most cases.
$ flask run
 * Serving Flask app "hello"
 * Running on http://127.0.0.1:5000/ (Press CTRL+C to quit)
Warning
Do not use this command to run your application in production. Only use the development server during development. The development server is provided for convenience, but is not designed to be particularly secure, stable, or efficient. See 部署方式 for how to run in production.
Open a Shell
To explore the data in your application, you can start an interactive Python
shell with the shell command. An application
context will be active, and the app instance will be imported.
$ flask shell
Python 3.6.2 (default, Jul 20 2017, 03:52:27)
[GCC 7.1.1 20170630] on linux
App: example
Instance: /home/user/Projects/hello/instance
>>>
Use shell_context_processor() to add other automatic imports.
Debug Mode
Set the FLASK_DEBUG environment variable to override the
application’s debug flag. The value 1 enables it, 0
disables it. Forcing the debug flag on also enables the debugger and reloader
when running the development server.
$ FLASK_DEBUG=1 flask run
 * Serving Flask app "hello"
 * Forcing debug mode on
 * Running on http://127.0.0.1:5000/ (Press CTRL+C to quit)
 * Restarting with inotify reloader
 * Debugger is active!
 * Debugger PIN: 223-456-919
Environment Variables From dotenv
Rather than setting FLASK_APP each time you open a new terminal, you can
use Flask’s dotenv support to set environment variables automatically.
If python-dotenv is installed, running the flask command will set
environment variables defined in the files .env and .flaskenv.
This can be used to avoid having to set FLASK_APP manually every time you
open a new terminal, and to set configuration using environment variables
similar to how some deployment services work.
Variables set on the command line are used over those set in .env,
which are used over those set in .flaskenv. .flaskenv should be
used for public variables, such as FLASK_APP, while .env should not
be committed to your repository so that it can set private variables.
Directories are scanned upwards from the directory you call flask
from to locate the files. The current working directory will be set to the
location of the file, with the assumption that that is the top level project
directory.
The files are only loaded by the flask command or calling
run(). If you would like to load these files when running in
production, you should call load_dotenv() manually.
Environment Variables From virtualenv
If you do not want to install dotenv support, you can still set environment
variables by adding them to the end of the virtualenv’s activate
script. Activating the virtualenv will set the variables.
Unix Bash, venv/bin/activate:
export FLASK_APP=hello
Windows CMD, venvScriptsactivate.bat:
set FLASK_APP=hello
It is preferred to use dotenv support over this, since .flaskenv can be
committed to the repository so that it works automatically wherever the project
is checked out.
Custom Commands
The flask command is implemented using Click. See that project’s
documentation for full information about writing commands.
This example adds the command create_user that takes the argument
name.
import click
from flask import Flask

app = Flask(__name__)

@app.cli.command()
@click.argument('name')
def create_user(name):
    ...
flask create_user admin
This example adds the same command, but as user create, a command in a
group. This is useful if you want to organize multiple related commands.
import click
from flask import Flask
from flask.cli import AppGroup

app = Flask(__name__)
user_cli = AppGroup('user')

@user_cli.command('create')
@click.argument('name')
def create_user(name):
    ...

app.cli.add_command(user_cli)
flask user create demo
Application Context
Commands added using the Flask app’s cli
command() decorator will be executed with an application
context pushed, so your command and extensions have access to the app and its
configuration. If you create a command using the Click command()
decorator instead of the Flask decorator, you can use
with_appcontext() to get the same behavior.
import click
from flask.cli import with_appcontext

@click.command
@with_appcontext
def do_work():
    ...

app.cli.add_command(do_work)
If you’re sure a command doesn’t need the context, you can disable it:
@app.cli.command(with_appcontext=False)
def do_work():
    ...
Plugins
Flask will automatically load commands specified in the flask.commands
entry point. This is useful for extensions that want to add commands when
they are installed. Entry points are specified in setup.py
from setuptools import setup

setup(
    name='flask-my-extension',
    ...,
    entry_points={
        'flask.commands': [
            'my-command=flask_my_extension.commands:cli'
        ],
    },
)
Inside flask_my_extension/commands.py you can then export a Click
object:
import click

@click.command()
def cli():
    ...
Once that package is installed in the same virtualenv as your Flask project,
you can run flask my-command to invoke the command.
Custom Scripts
When you are using the app factory pattern, it may be more convenient to define
your own Click script. Instead of using FLASK_APP and letting Flask load
your application, you can create your own Click object and export it as a
console script entry point.
Create an instance of FlaskGroup and pass it the factory:
import click
from flask import Flask
from flask.cli import FlaskGroup

def create_app():
    app = Flask('wiki')
    # other setup
    return app

@click.group(cls=FlaskGroup, create_app=create_app)
def cli():
    """Management script for the Wiki application."""
Define the entry point in setup.py:
from setuptools import setup

setup(
    name='flask-my-extension',
    ...,
    entry_points={
        'console_scripts': [
            'wiki=wiki:cli'
        ],
    },
)
Install the application in the virtualenv in editable mode and the custom
script is available. Note that you don’t need to set FLASK_APP.
$ pip install -e .
$ wiki run
PyCharm Integration
The new Flask CLI features aren’t yet fully integrated into the PyCharm IDE, so we have to do a few tweaks to get them working smoothly. These instructions should be similar for any other IDE you might want to use.
In PyCharm, with your project open, click on Run from the menu bar and go to Edit Configurations. You’ll be greeted by a screen similar to this:
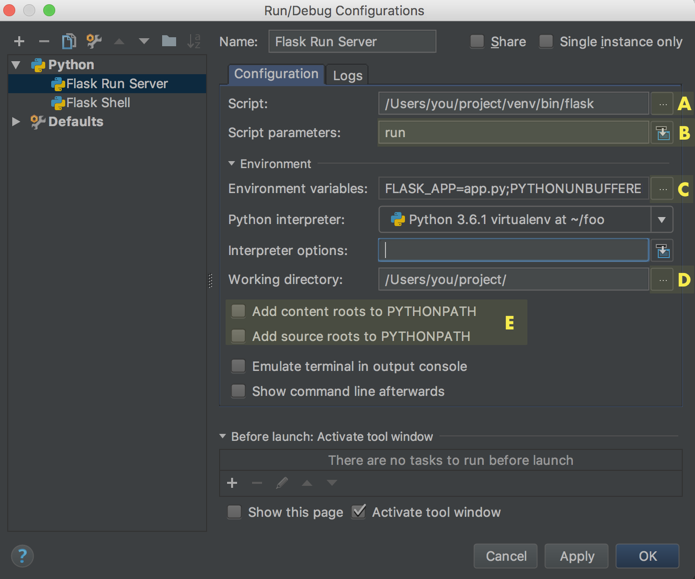
There’s quite a few options to change, but once we’ve done it for one command, we can easily copy the entire configuration and make a single tweak to give us access to other commands, including any custom ones you may implement yourself.
For the Script input (A), navigate to your project’s virtual environment.
Within that folder, pick the flask executable which will reside in the
bin folder, or in the Scripts on Windows.
The Script Parameter field (B) is set to the CLI command you to execute.
In this example we use run, which will run the development server.
You can skip this next step if you’re using Environment Variables From dotenv. We need to add an
environment variable (C) to identify our application. Click on the browse
button and add an entry with FLASK_APP on the left and the name of the
Python file or package on the right (app.py for example).
Next we need to set the working directory (D) to be the same folder where
our application file or package resides. PyCharm changed it to the directory
with the flask executable when we selected it earlier, which is incorrect.
Finally, untick the PYTHONPATH options (E) and give the configuration a good descriptive name, such as “Run Flask Server”, and click Apply.
Now that we have a configuration which runs flask run from within PyCharm,
we can simply copy that configuration and alter the Script argument
to run a different CLI command, e.g. flask shell.
